Virtual Machines
KNOWN ISSUE As of January 30th, 2018 there is an error a few students are encountering when trying to run a VM in VirtualBox that says, “The device helper structure version has changed.” To remedy this error for now you will need to change the USB settings in your VM. All you need to do is open the VM settings, click the USB tab, and either disable the USB Controller entirely or select the USB 1.1 radio button. A permanent solution for this problem is in the works; this message will disappear once it is fixed!
What they are
Virtual machines (VMs) give you the ability to use other operating systems without having to shut down the one you are already on. This is both simpler than having to configure a system to dual boot and of course faster than rebooting a system to the other operating system. Using a VM is as simple as using any other application on your computer after the initial setup of the virtual environment.
An important note is the keyword “virtual”. A virtual operating system does not directly control your physical hardware, rather a part of the VM’s software called the hypervisor dynamically allocates resources when needed based on usage at that point. If you are interested in how VMs work, you can read this page. Your “guest” operating system, the one installed in your VM, is stored as a file taking up a sizable portion of your hard drive storage. Depending on the operating system, the VM filesize can vary anywhere from 5 to 40gb.
What is available
Oracle VirtualBox
On the lab computers, we have provided Oracle VM VirtualBox as an
application to create and use virtual machines. If you want to create your own at home,
feel free to download VirtualBox as
that is an open source program.
Vagrant
The CS lab machines also have the vagrant command. Vagrant is an
extremely powerful and portable VM manager that allows you to utilize
premade “boxes” to spin up a virtual machine in whatever operating
system you want in minutes!
Like with all other VMs, CS Support recommends you use a usb drive to hold all the Vagrant and VM related files so that they are portable and do not overfill your account’s storage!
Check out our page on Vagrant for a more bare bones introduction
or you can check out their Getting Started page for more in depth info!

Helpful resources
There are plenty of guides online to help you spin up a virtual machine. We recommend utilizing Google to find some!
To get you started here are a couple helpful links:
How to install a VM onto a USB drive in VirtualBox
Please avoid storing any Virtual Machine onto your Home Directory as this will quickly fill up our file servers and slow down the network for everybody!
Creating a VM on a USB drive is simple and makes that machine easy to move around from computer to computer.
Requirements:
An installer disk image (.iso) of your operating system of choice
A USB drive large enough to hold the contents of your OS.
Steps:
Ensure your USB drive is plugged in, you can access it, and that there is enough space for your OS.
-
Click the New button to start the creation process.
-
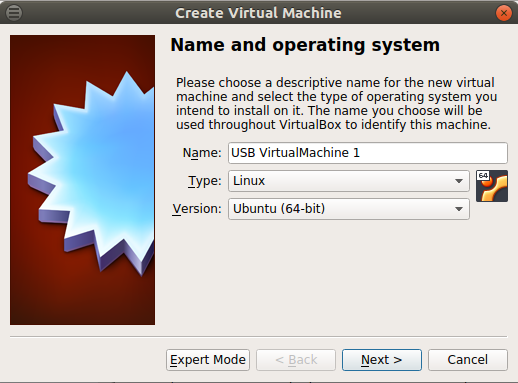
A window titled “Create Virtual Machine should pop up that looks like this:
Enter a name for your VM and fill out the Operating System information as matches your choice of OS. Click “Next >”
Enter the amount of Memory you want in your system. We recommend you check the Operating System’s minimum requirements to make this decision. Click “Next >”
-
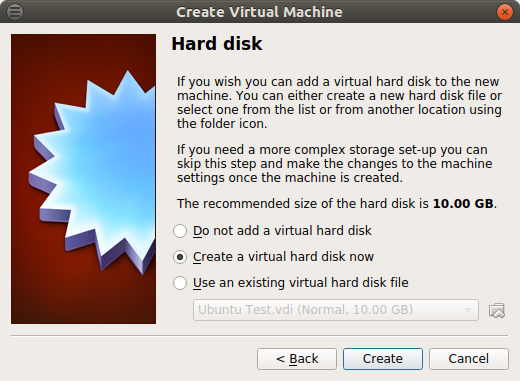
You should now see the Virtual Hard Disk creation screen that looks like this:
Ensure the “Create a virtual hard disk now” radio button is ticked and click “Create”
Select the Virtual Hard Disk type (if you are not sure what to pick, the default (VDI) is fine). Click “Next >”
Select either “Dynamically allocated” or “Fixed size.” Click “Next >”
-
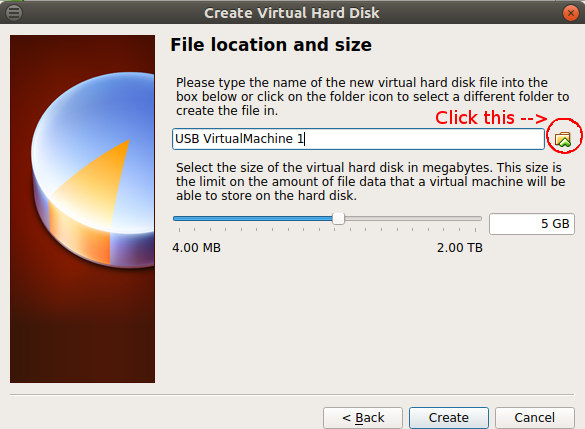
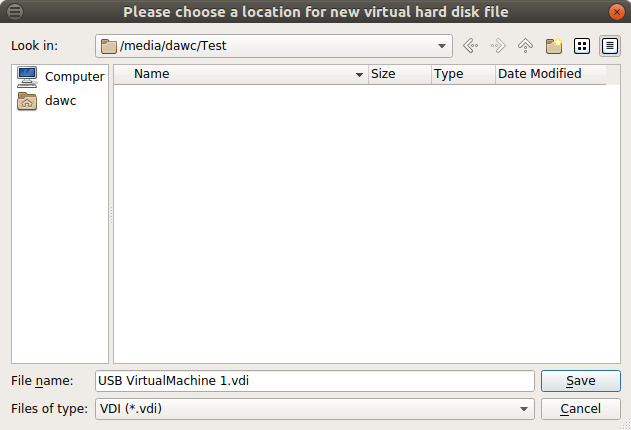
You should now see a page that looks like this:
Click the folder icon with the little green arrow as indicated in the image above to browse for your USB drive.
-
In this file browser, click “Computer” and browse to
/media//and click “Save” as shown here (note the USB drive used here is empty): Allocate the recommended amount of storage (less than or equal to the size of your USB drive), and click “Create”
You can now start your new Virtual Machine. When you start it, it will prompt you to select your Boot image (the .iso of your Operating System of choice).
Now you can walk through installing your VM! Once that process is complete, you can use this machine wherever you have your USB drive!

What not to do
Try not to store Virtual Machines on your Home Directory!
Most online explanations and guide will help in creation of virtual
machines but as a department we are concerned with how you plan to store
them. The use of virtual machines on these computers encourages
exploration and understanding of systems. Given the amount of space on
our file server, the latency you will encounter while running a VM
off of network storage, and the drastic impact usage like this has on our File server,
we do not recommend trying to run a VM that is stored on your Linux /home/$USERNAME/
directory (accessible as H:\ on Windows).
Our suggestion is: if you have a need to create VMs for any purpose, keep it on a flash drive. When you create a virtual machine, install it onto a flash drive so that you do not have to slow down your profile load time by downloading a 10gb virtual machine every time you log in.
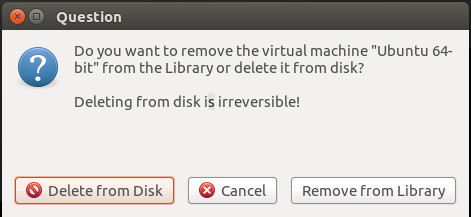
To remove a VM, right-click it and select remove. It will prompt you to either remove it from the VM Manager’s library or from the hard disk. If you are removing it to free space on your profile, delete it from the disk!