SSH Guide
What is SSH?
SSH stands for Secure Shell. It is used to establish a secure connection to an account on another computer to access files or run programs without physical access to the machine.
At Western, we allow you to ssh into our Linux COW (Cluster Of
Workstations) and Lab Systems from anywhere inside or outside the University to access
the files in your account’s home
directory.
Accessing Linux with SSH
SSH Config
If you find typing the whole ssh ${username}@${hostname}.cs.wwu.edu
line into your terminal exhausting, there is a perfect solution for you:
SSH configuration!
SSH configuration will allow you to use any shorthand alias to connect
to a remote server, for example ssh linux for ssh ${username}@linux.cs.wwu.edu. Your ssh config file is found at
~/.ssh/config.
Here is an example of an ssh config file for linux.cs.wwu.edu:
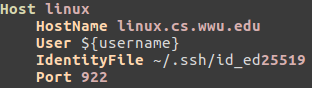
Note:
You can call the
Hostanything, it does not have to be linux. It is just your alias for thesshcommand.Replace
${username}with your username or the account you have permission to use.
Getting files with SCP
To copy files from a remote machine that you can access with ssh, you
can use Secure Copy, scp.
For Example, if you want to download document.txt using linux.cs.wwu.edu, from your local machine, use the following command:
scp ${username}@linux.cs.wwu.edu:~/document.txt ~/Documents/
Assuming this file exists, this command will copy the file
document.txt from your CS account home
directory
(denoted with ~) to your local machine’s Documents directory.
Notice that scp uses a capital P for its port option flag.
This can also work in the opposite direction: copying files from your local computer to a remote destination.
scp ~/Documents/document.txt ${username}@linux.cs.wwu.edu:~/copied.txt
This command will copy the file document.txt from your local machine
to the home directory of your CS account renamed to copied.txt.
SSH Keys
Using an SSH key will make your login more secure. This section will give you the skinny on SSH keys and key usage. At the end of this section will be a link to a more in depth description on SSH security.
SSH keys are generated in a public/private keypair. When you ssh into
another machine, it sends your public key to that machine’s
~/.ssh/authorized_keys file. When you connect to that machine later,
it checks your private key against the public key it has through
cryptographic algorithms to verify your identity.
Your private key should never be given out to ANYBODY!
Western uses EdDSA in the form of Ed25519 for our key encryption method. To generate the key pair use this command in the terminal:
ssh-keygen -t ed25519
This command will ask for a passphrase and then generate two files in
the ~/.ssh directory: id_ed25519 and id_ed25519.pub. The former is
your private key (Keep it secret! Keep it safe!), and the latter
is your public key signified with the .pub extension.
Here is an example of what the interaction will look like:
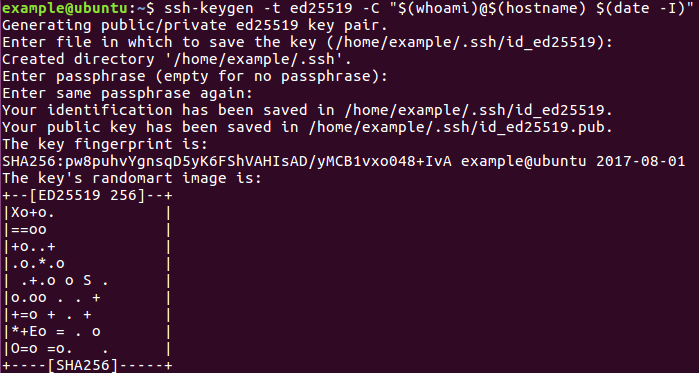
note: the password field appears blank because password characters are hidden in the terminal.
also note: if you leave the
Enter the file in which to save the keyline blank, it will default to the path in the parentheses.
Getting public key to WWU CS Systems from Off Site
After generating your key, you will need to send the public key to the /home/${username}/.ssh directory of the system you will access. On the CS Network, your directory will get mounted anywhere you would normally sign in for academic use (this may not apply to research or project systems). To get the public key from your personal system to the CS location, ssh-copy-id should be used.
ssh-copy-id -i ~/.ssh/${key}.pub ${username}@${host}
So if strongbad were to connect to linux.cs.wwu.edu the command would appear as below:
ssh-copy-id -i ~/.ssh/strongbad.pub strongbad@linux.cs.wwu.edu
Other Key Formats
While all of the Computer Science department’s SSH servers accept newer
key formats like Ed25519
this is not universally true. Some services outside the university might
not. You may wish to consider another algorithm like
RSA or
ECDSA.
You can generate those types of keys by changing which argument you give
to ssh-keygen’s -t flag. For example, if you wanted to generate a
4096-bit RSA key you would do
ssh-keygen -t rsa -b 4096
You are now all set to use these keys!
Tunneling ANY ports through SSH
Let’s say you want to see information on machine B but can only do so going through a specific port. Instructions can be found here.
Utilizing the SSH Agent
While SSH keys allow for a more secure connection they still do not resolve the problem of having to enter a password for your public/private key each time you want to ssh into a system. ssh-agent and ssh-add solve this problem by decrypting the key and storing it in memory so that the user only needs to type in his/her password once.
Basic Usage
Step 1 Starting ssh-agent
The following command will start ssh-agent
eval $(ssh-agent)
Step 2 Add keys to ssh-agent
ssh-add will add the default key (id_rsa) and keep the passphrase stored in memory so that you do not have to keep typing it.
ssh-add
ssh-add will ask you for your password and store it for as long as you are logged in.
See loaded Keys
If you wish to see all of your loaded keys, use the command:
ssh-add -l
SSH-Agent Forwarding
If you would like to utilize SSH Keys rather than typing your password multiple times, a user can load their SSH Keys and pass their agent information across the SSH connection.
After generating SSH keys one needs to add it to their authorized_keys file. This is located at /home/${username}/.ssh/. If it is not there one needs to make the file. The cat line appends the public key to the end of the authorized_keys file, creating one as well if one does not exist.
cd /home/${username}/.ssh/
cat /path/to/${public_ssh_key}.pub >> /home/${username}/.ssh/authorized_keys
After this is complete, one can use the ssh_key to connect. To do this, one would leverage the -A and -i flags. For an example, if your cs username is strongbad, your private key is named id_ed25519_strongbad and you are accessing labs.cs.wwu.edu, the command would look like the below code block.
ssh -A -i /home/strongbad/.ssh/id_ed25519_strongbad strongbad@labs.cs.wwu.edu
Leveraging your SSH config
As was demonstrated in the SSH config examination, the SSH config can make things easier. This is achieved by adding the IdentityFile and ForwardAgent options shown below.
Host labs labs-last
  Hostname %h.cs.wwu.edu
  User strongbad
  Port 22
  Compression yes
  IdentityFile /home/strongbad/.ssh/id_ed25519_strongbad
  ForwardAgent yes
After doing this, all strongbad would need to do is:
ssh labs
If you had not entered a password for your SSH key yet (all SSH keys should have a password), it would prompt you to enter that password, and then automatically sign you in. After this, once the key is loaded, you would not need to enter that password again.
Advanced usage
SSH is a very deep tool and can be used in a number of empowering ways.
X Forwarding
If you have an X server running on your local system (XOrg on
BSD/Linux, XQuartz on macOS, or VcXsrc on Windows) you may want the
option to forward your X traffic from the lab machine to your local
system. Adding the -Y flag to ssh will do this for you, and
labs.cs.wwu.edu will automatically pass it on to the lab system that
it puts you on. Alternatively you can update your ~/.ssh/config labs
entry with the following lines:
Compression yes
ForwardX11 yes
ForwardX11Trusted yes
When it comes to X forwarding, compression can really help speed things up. If you are not doing X forwarding it is not needed, and can often slow things down.
Let’s look at a sample X forwarding session to see if it works:
[strongbad@lappy486 ~]$ ssh -Y strongbad@labs.cs.wwu.edu
strongbad@labs.cs.wwu.edu's password:
Warning: Permanently added the ECDSA host key for IP address '[140.160.137.177]:22' to the list of known hosts.
strongbad@cf418-15.cs.wwu.edu's password:

strongbad@cf418-15:~$ xeyes
^C
strongbad@cf418-15:~$
This created a window on my local desktop, but the application was running on the remote lab machine!